
Commonly referred to simply as “Burst”
The EX Burst system in MBON works similar to the Super meter in fighting games. You charge the Burst meter by dealing and taking damage, and then activate it by pressing A+B+C for a short buff and get access to your ultimate move. Here in MBON, players get to choose from 3 types of Burst: Fighting, Extend, and Shooting. Each type of Burst has a different set of modifiers and extra effects, and is a very important tool in securing your victory
Types of Burst and when to use them
You can only use your Burst when the bar is at least half filled. Bursts usage is split into 3 types: Half, Full, or Escape.
Half burst happens when your meter is between 50-99% filled, Full is when the bar is at 100%. The FULL indicator will also appear when your meter is full. Escape burst happens when you use the burst while being flinched or in a downed state, which allows your unit to recover into a neutral state after a short animation. Using Escape Burst will consume 30% of your current meter.
For Fighting and Shooting Burst, you can only perform an Escape Burst if your meter is at 100%. For Extend, you can Escape with 50% or more meter.
In most situations, you would use your Shooting or Fighting Burst when your meter is half full and you have sufficient HP. Going simply by the amount of boost recovered, doing 2 half Fighting Bursts will get you 2×70% Boost as compared to 1 full burst’s 100%. While the duration is longer for the full burst, your opponent can simply spend the whole time running, or lie on the floor in a downed state for an elongated period of time. Extend Burst would usually be used when you get hit, and want to escape additional combo damage.
How to charge the Burst meter
Your Burst meter will increase whenever any of the following happens:
- When you get shot down while not in Burst (your unit’s cost affects the gain rate)
- When you deal or take damage (Friendly fire included)
- When your partner is shot down
- When you perform a successful Guard
- When you land a hit with an attack that charges Burst meter (e.g. The O’s 2BB)
Additionally, you will gain more meter under the following conditions:
- Higher cost units gain Burst more quickly
- For units in the same cost bracket, a unit with lower maximum HP will gain more than another unit with a higher maximum HP
- When you will lose the game if either you or your partner dies
What happens during Burst
The following happens when you enter Burst, and during:
- Recover Boost gauge and refills ammo for most types of weapons
- Reload speed and Charge speed for CSA, CSB increases
- Gain attack, defense, and movement speed modifiers
- Down value for all attacks reduced by 10%
- Some suits gain unique attacks or assists during Burst
Shots that has been fired or melee attacks that are already in motion will gain the modifiers when entering Burst. However, the buff disappears from all attacks (ranged, melee, assists) when Burst ends. Burst will end when your Burst meter is empty and your unit is not in an attacking animation. If your unit is in a very long attack animation (e.g. Quanta CC8B) and your Burst meter is empty, it will stay in burst until the animation is over.
Additionally, some units will have a special modifier to their unit during Burst. Some examples are:
- God and Master Gundam entering Hyper Mode, adding more attack
- Trans-Am capable units such as Exia, Reborns etc gain extra speed
- SEED users such as Freedom, Impulse gain speed and boost efficiency
Burst Attacks
While in Burst, press A+B+C together to initiate your Burst Attack. This can range from a cool melee combo, a barrage of shots or even a self buff. You can only use this attack once per Burst. Once activated, there’s no going back, and cannot cancel out of the Burst Attack with any means. Burst Attacks often have very low to no down value, making it a great combo finisher. Some units have 2 Burst Attacks. The alternate Burst Attack can be activated with the input 2+A+B+C (down ABC). You can tell whether you have used your Burst Attack or not by looking at your Burst meter. If it’s flashing, your Burst Attack is still available. Once you use your Burst Attack (or either one, if your unit has 2) the bar will stop flashing.
Some suits’ Burst Attack can be used to refill ammo due to their animation. For example:
- Tieren Taozi’s will refill her BC
- X3 will refill his CSB
- Unicorn will force him into Destroy mode
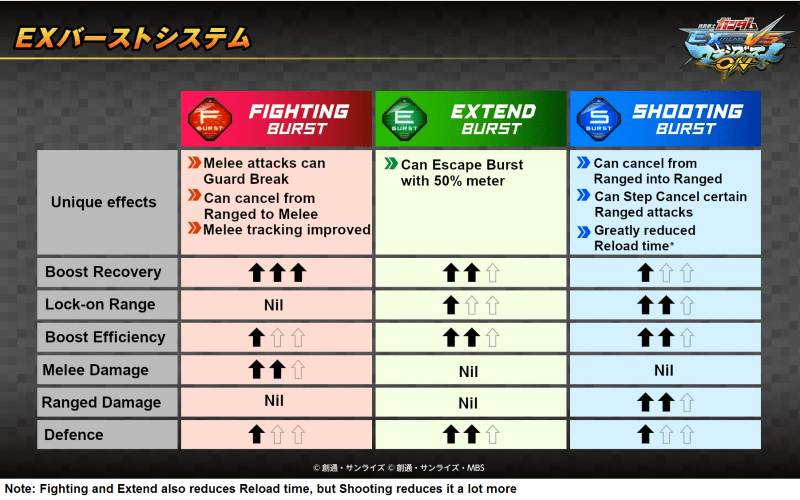
Below are details for each of the bursts.
Fighting Burst
The ever familiar Burst type that favours speed and melee attacks. Fighting Burst recovers the most amount of boost and also gives the largest increase in speed (not taking into consideration unique Burst types like Trans-Am), giving it a great comeback factor. This Burst is not only used by melee suits, but also for all-rounders or (front) suits that doesn’t benefit enough from Shooting Burst.
The first stage of your melee attacks (including melee Burst attack) has the ability to perform a Guard Break. If the melee attack is blocked, the unit who blocked will drop his guard and be flinched. This will usually give you enough time to recover and score another melee hit (assuming you are using a melee with decent to fast startup).
During Fighting Burst, you can also cancel from a ranged attack into a melee attack. This melee includes both your regular 4/5/6/2/8 melee and also your other AB/AC/BC moves which are of melee property. This opens up a great variety of cancel routes for a surprise attack. Combo this new cancel route together with Guard Break, you can charge into a blocking enemy who blocked your initial range attack and get a Guard Break on them. Additionally, you can also cancel from a melee attack (before it hits) into a melee Burst Attack (as long as the first hit of the Burst Attack is a melee attack, like RX-78’s Last Shooting where the first hit is a beam sabre slash) . While there are limited uses for this cancel route, the two main uses for this is 1) Superarmor from the Burst attack 2) your first melee attack has traveled its maximum range but still short.
Examples of suits that will use Fighting Burst are Bael, Barbatos Lupus, Exia, etc.
Some suits are able to use both Fighting and Shooting, and it’s up to you based on your playstyle. For example, front suits like Hi-Nu and Double X can benefit from Fighting Burst greatly as their non-vernier ranged attacks are pretty straightforward, and they also benefit from the mobility as they have great melee attacks.
Extend Burst
A Burst catered towards survival. Unlike the other two bursts, the key feature of Extend Burst is that you can escape Burst at just 50% of the meter onwards, and you can perform a diagonal step during burst. Additionally, the defense modifier for Extend is at a whopping 30%. These benefits greatly increases general survival and can help you survive long enough for your teammate to either save you or close out the match.
However, Extend Burst has very little to offer in terms of offensive power except that it recovers a bit more boost than half Shooting Burst. There’s no extra cancel routes unlike the other two, and only a tad bit of a mobility increase (not taking into account your unit’s specific modifiers). Because Escape bursting at half-gauge still takes a significant chunk off your remaining gauge, at times it may be better to use it pre-emptively for a quick boost refill to run away BEFORE getting hit.
In a proper team composition, this is the go-to burst for the back unit to preserve his life and prevent over-costing the front unit.
Common suits that use Extend Burst are Strike Noir, Qubeley, and Dark Hound.
Shooting Burst
For all the trigger happy players, pick this! Shooting Burst not only extends your red lock range, it also lets you cancel from ranged attacks into other ranged attacks. This means you can spam your beam rifle shots continuously, or even mix in other shooting attacks to barrage your enemy. Furthermore, you can perform a Step after a ranged attack. This helps a lot as you will be able to do a sidestep freefall while shooting at your targets, land to recover boost, and continue attacking.
You also get an additional cancel route from any ranged attack into your Burst attack (regardless of whether your Burst attack is a ranged or a melee or a self-buff attack). There isn’t too much use for this, but it’s an option.
Shooting Burst can be put to very good use together with the Red Lock Carryover technique as the ranged>ranged attack is a legitimate cancel route. So long as your ammo doesn’t run out and your first shot is fired in red, if your target escapes to green lock , your shots will still track normally as if it’s in red lock. Timed correctly with the suitable attack, you will be able to land the killing blow from half the map away.
Suits that benefit from Shooting Burst include Strike Freedom, Gottrlatan, and Barbatos.